
Áp dụng Vigor1100ax| Vigor2136
Mô hình
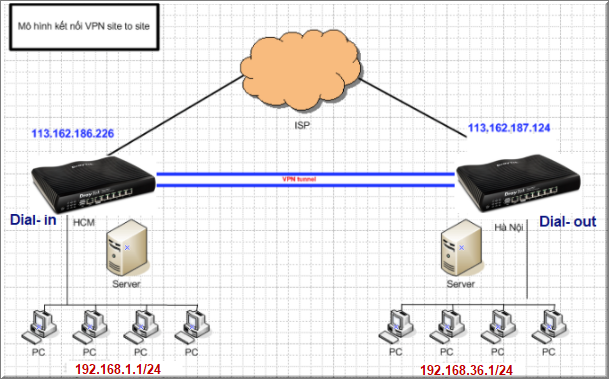
Để cấu hình VPN WireGuard giữa hai Vigor2136 một cách dễ dàng, hãy mở đồng thời trang Web cấu hình của cả hai router.
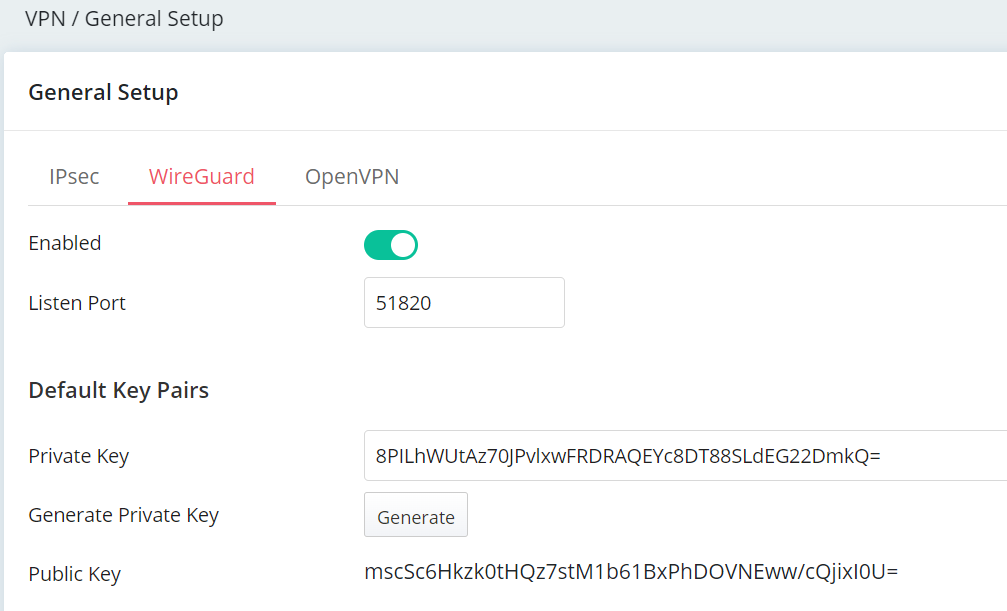
1. Thiết lập General Key trên Router VPN Server
Vào VPN/ General Setup/ WireGuard kích hoạt dịch vụ WireGuard VPN
- Enable: chọn ON
- Nhấn Generate khởi tạo Private Key.
Key Pairs trong phần General Setup sẽ được gán cho Vigor Router. Các Client VPN WireGuard (peer) cần khai báo Server Public Key của Vigor Router để tạo profile WireGuard VPN. Sao chép Public Key của server WireGuard VPN để sử dụng

2.Thiết lập profile WireGuard VPN LAN to LAN trên Router VPN Client
Vào VPN / Site to Site VPN, nhấn Add + to tạoVPN Site to Site
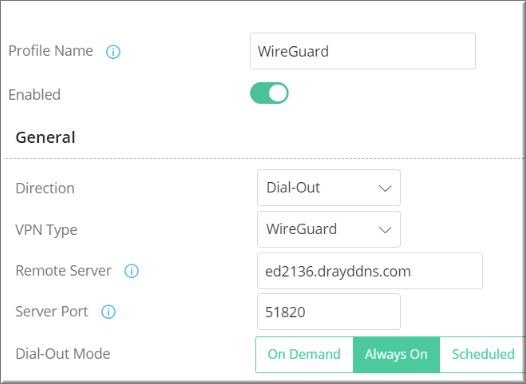
2.1 Trong General Settings
- Profile Name: đặt tên Profile
- Enable: chọn ON
- Direction: Chọn Dial-Out
- VPN Protocol: chọn WireGuard
- Remote Server: Điền IP WAN hoặc tên miền của router VPN server
- Dial-Out mode: chọn Always ON
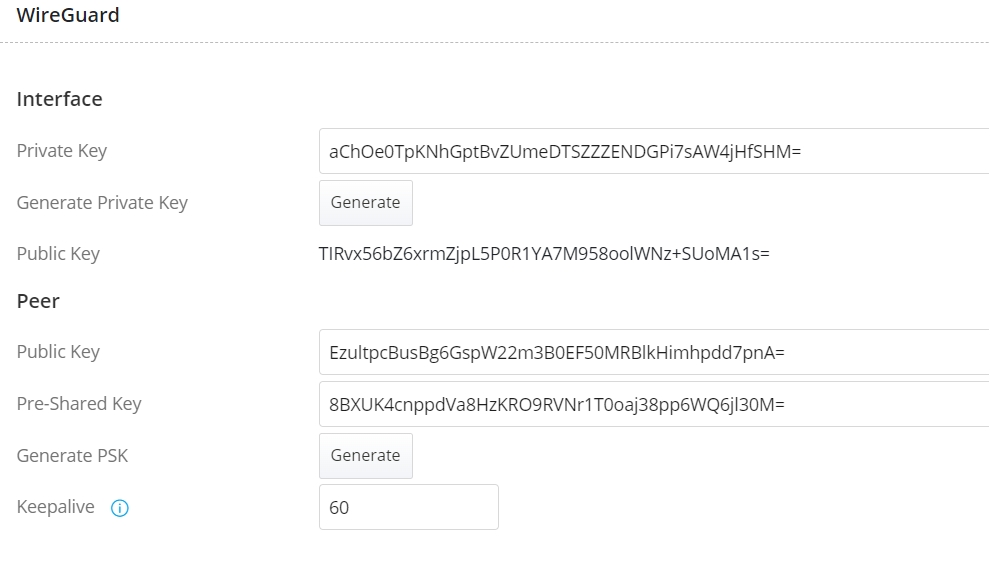
2.2 Trong Tab WireGuard Settings
Interface
- Nhấn Generate khởi tạo Public Key và Private Key cho profie VPN
- Sao chép Public Key của router VPN Client. Router VPN server cần Client Public Key này để tạo profile WireGuard VPN
Peer
- Public Key: dán Server Public Key (đã lưu ở bước 1)
- Nhấn Generate khởi tạo the Pre-Shared Key.
- Copy Pre-Shared Key của Profile VPN. Router VPN server cần sử dụng chung Pre-Shared Key để tạo profile WireGuard VPN
2.3 Tại Network Settings
- Local Network and Subnet Mask: điền lớp mạng nội bộ Router VPN Client (ví dụ 192.168.36.0/24)
- Remote Network and Subnet Mask: điền lớp mạng LAN của Router VPN Server (ví dụ 192.168.1.1/24)
- Routing/ NAT mode: chọn Routing
- TẠM THỜI KHÔNG NHẤN APPLY LƯU CẤU HÌNH; CHUYỂN QUA GIAO DIỆN WEB ROUTER VPN SERVER TẠO PROFILE VPN

3. Thiết lập profile WireGuard VPN LAN to LAN trên Router VPN Server
Vào VPN / Site to Site VPN, nhấm Add + to tạo Profile VPN LAN to LAN
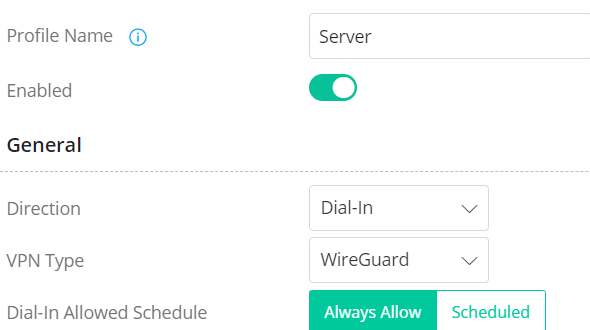
3.1 Trong General Settings:
- Profile Name: đặt tên profile VPN
- Enable: chọn ON
- Direction: chọn Dial-In
- VPN Protocol: Chọn WireGuard
- Dial-In Allowed Schedule: Chọn Always Allow cho phép kết nối bất kì thời gian nào hoặc Scheduled để chọn thời gian cho phép VPN
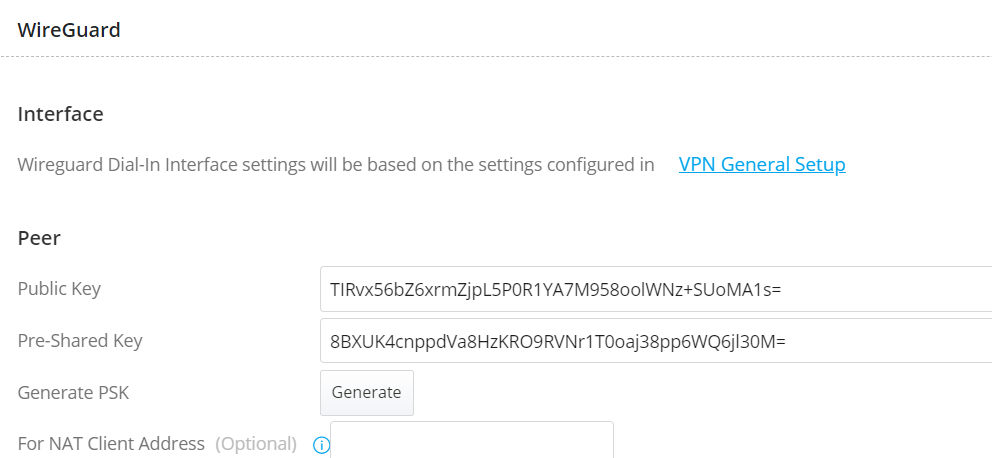
3.2 Tại WireGuard Settings
Peer
- Public Key: dán WireGuard VPN Client’s Public Key (đã lưu ở bước 2.2).
- Pre-Shared Key: dán Pre-Shared Key (đã lưu ở bước 2.2)
3.3 tại Network Settings
- Local Network and Subnet Mask: điền lớp mạng nội bộ Router VPN server (ví dụ 192.168.1.0/24)
- Remote Network and Subnet Mask: điền lớp mạng LAN của Router VPN Client (ví dụ 192.168.36.1/24)
- Nhấn Apply lưu cấu hình

4. Trở về trang cấu hình Router VPN Client nhấn Apply lưu cấu hình.
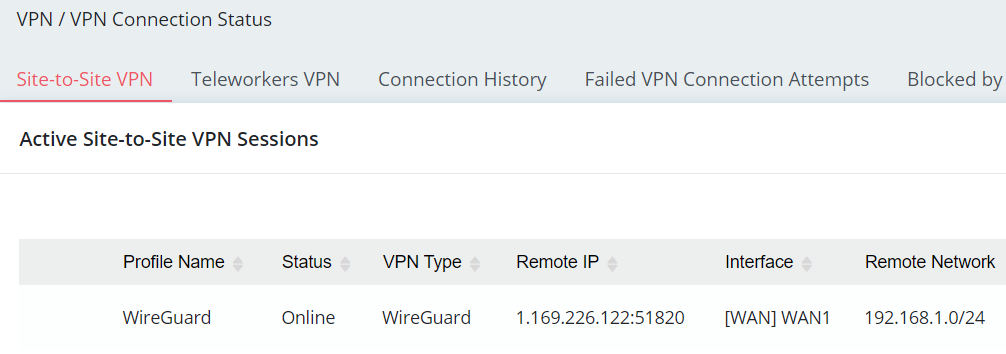
5.Vào VPN / VPN Connection Status kiểm tra kết nối WireGuard VPN LAN to LAN đã được thiết lập hay chưa.”
Thực hiện ping IP router đầu xa để kiểm tra trạng thái kết nối VPN
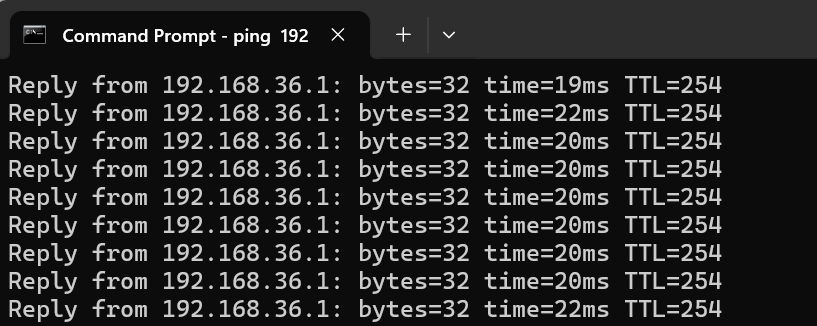
Đảm bảo router 2 site đã kích hoạt Ping trong LAN trong System Maintenance / Management.
